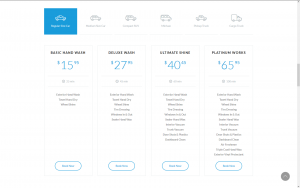
I’ll keep the intro very short, saying just that the goal of this guide is to build a series of pricing tables that are based on services category. And all this using Divi. The example and inspiration will be the pricing ranges from this template, which is a non-Divi template built with only the good ol’ HTML. So let’s get started.
The problem with Divi in it’s default behavior is that, while we do have Tabs module and Pricing table module, we can’t combine them together. Or any modules, for that matter. But that is exactly what we are going to do. And for that we will add shortcodes functionality for the modules. For this we’ll gonna need to add a function into our child theme’s functions.php file. If you don’t have a child theme, make one. This is the function that we need:
add_shortcode('showmodule', 'showmodule_shortcode');

function showmodule_shortcode($moduleid) {
	extract(shortcode_atts(array('id' =>'*'),$moduleid));
	return do_shortcode('[et_pb_section global_module="'.$id.'"][/et_pb_section]');
}
This will allow us to build shortcodes based on module’s ID and insert that shortcode inside another module. The shortcode will look like this: [showmodule id="123"].
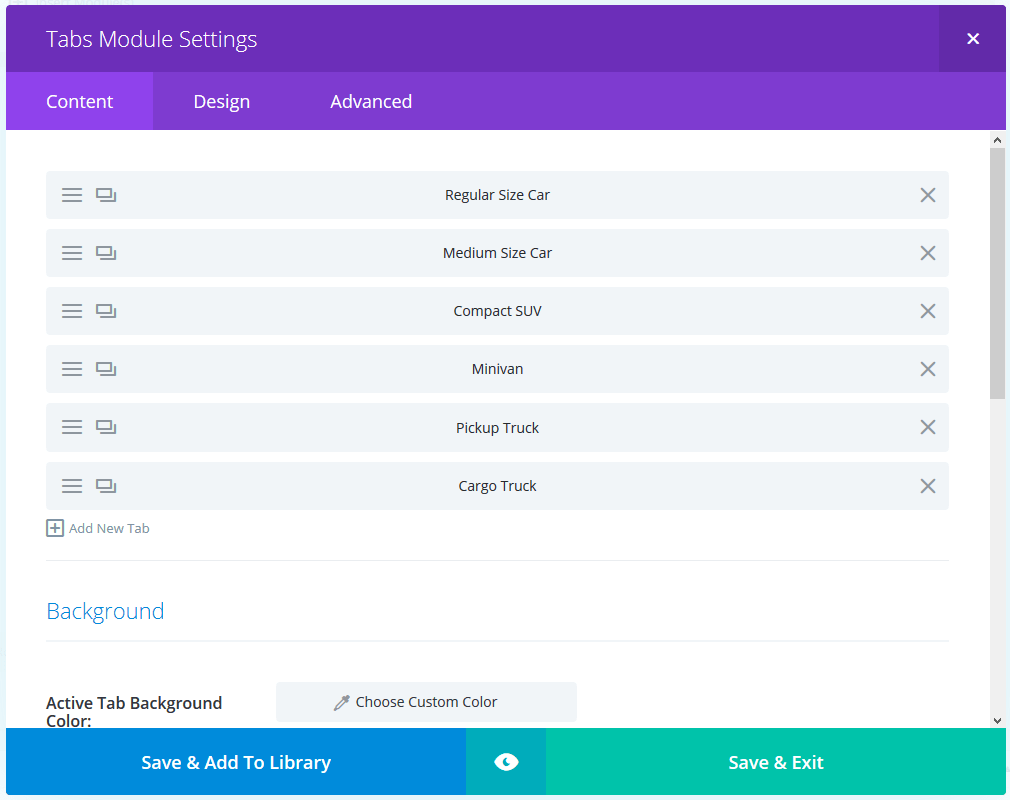
Now… how do we get that module ID? Since we’re dealing with cars here, let’s build the pricing tables for each car category and then grab that ID. We’ll going to make it as similar as possible to example, so we’ll just steal copy it’s contents.
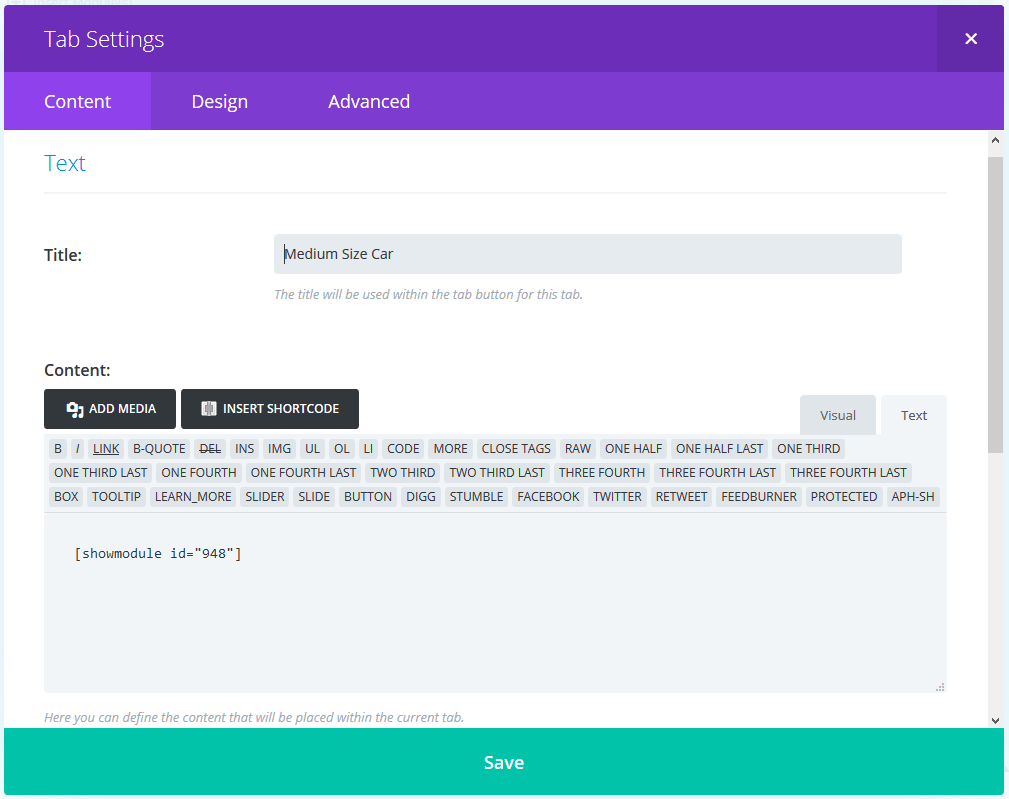
?post=XXX and that number is the ID of that particular module. For instance, in the example image we see that the hovered module ID is 948, so our module shortcode will be [showmodule id="948"].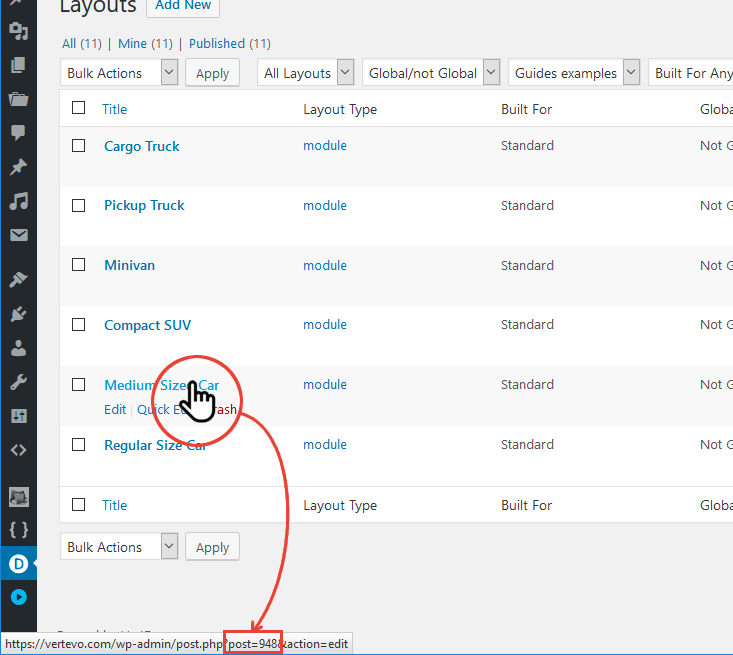
The preparations are pretty much done, we have the shortcodes function, we have the pricing tables, we can make shortcodes for each pricing table. All we need not is the tabs.
Adding the Tabs module is pretty straight forward, we add one tab for each car category, we give it the appropriate title and then, in the tab’s content, we add the shortcode with the ID of that particular category. To not get into trouble while adding the shortcode, I recommend to have the editor in Text mode, because sometimes the Visual editor likes to replace characters with HTML special entities.
.pricing-tabs {
	background: #FFF;
	margin-left: -25px;
	padding: 25px !important;
}
@media all and (min-width: 981px) {
	.pricing-tabs {
		width: calc(100% + 10.6%) !important;
	}
}
@media all and (max-width: 980px) {
	.pricing-tabs {
		width: calc(100% + 50px) !important;
	}
}
.pricing-tabs .et_pb_tabs_controls {
	display: -webkit-box;
	display: -ms-flexbox;
	display: flex;
	-webkit-box-orient: horizontal;
	-webkit-box-direction: normal;
	-ms-flex-flow: row wrap;
	flex-flow: row wrap;
	margin: -5px;
}
.pricing-tabs .et_pb_tabs_controls li {
	display: -webkit-box;
	display: -ms-flexbox;
	display: flex;
	-webkit-box-flex: 1;
	-ms-flex: 1;
	flex: 1;
	-ms-flex-preferred-size: 120px;
	flex-basis: 120px;
	height: 120px;
	padding: 70px 0 0;
	border: none;
	border-bottom: 1px solid #DDD;
	margin: 5px;
}
.pricing-tabs .et_pb_tabs_controls li a {
	font-size: 90%;
	padding: 0;
	font-weight: 400;
	color: #AAA;
	text-align: center;
	width: 100%;
}
.pricing-tabs .et_pb_tabs_controls li:hover,
.pricing-tabs .et_pb_tabs_controls .et_pb_tab_active {
	background: #199CDB;
}
.pricing-tabs .et_pb_tabs_controls li:hover a,
.pricing-tabs .et_pb_tabs_controls .et_pb_tab_active a {
	color: #FFF !important;
}
.pricing-tabs .et_pb_tabs_controls li a:before {
	font-family: 'Vehicles';
	font-size: 60px;
	position: absolute;
	top: 30px;
	left: 0;
	width: 100%;
}
.pricing-tabs .et_pb_tab_0 a:before { content: '\62'; }
.pricing-tabs .et_pb_tab_1 a:before { content: '\63'; }
.pricing-tabs .et_pb_tab_2 a:before { content: '\65'; }
.pricing-tabs .et_pb_tab_3 a:before { content: '\6a'; }
.pricing-tabs .et_pb_tab_4 a:before { content: '\67'; }
.pricing-tabs .et_pb_tab_5 a:before { content: '\6b'; }


.pricing-tabs .et_pb_tab {
	padding: 25px 0 0;
}
.pricing-tabs .et_pb_pricing_table_wrap {
	display: -webkit-box;
	display: -ms-flexbox;
	display: flex;
	-webkit-box-orient: horizontal;
	-webkit-box-direction: normal;
	-ms-flex-flow: row wrap;
	flex-flow: row wrap;
	-webkit-box-align: stretch;
	-ms-flex-align: stretch;
	align-items: stretch;
	margin: 10px -10px;
}
.pricing-tabs .et_pb_pricing_table {
	-webkit-box-flex: 1;
	-ms-flex: 1;
	flex: 1;
	-ms-flex-preferred-size: 180px;
	flex-basis: 180px;
	border-color: #DDD;
	margin: 10px !important;
	padding: 20px 15px 75px;
}
@media all and (max-width: 980px) {
	.pricing-tabs .et_pb_pricing_table {
		-ms-flex-preferred-size: 250px;
		flex-basis: 250px;
	}
}
.pricing-tabs .et_pb_pricing_heading {
	background: transparent;
}
.pricing-tabs .et_pb_pricing_heading h2 {
	font-family: "Open Sans", Arial, sans-serif;
	font-size: 16px;
	font-weight: 600;
	color: #333;
	margin-top: 0;
}
.pricing-tabs .et_pb_pricing_heading span {
	font-size: 16px;
	color: #AAA;
	border-top: 1px solid #DDD;
	border-bottom: 1px solid #DDD;
	-webkit-transform: translateY(80px);
	    -ms-transform: translateY(80px);
	        transform: translateY(80px);
	padding: 10px 0;
}
.pricing-tabs .et_pb_pricing_heading span:before {
	content: '}';
	font-family: 'ETmodules';
	margin-right: 5px;
	font-weight: bold;
}
.pricing-tabs .et_pb_pricing_content_top {
	border: none;
	-webkit-transform: translateY(-50px);
	    -ms-transform: translateY(-50px);
	        transform: translateY(-50px);
	padding-bottom: 10px;
}
.pricing-tabs .et_pb_dollar_sign {
	font-size: 22px;
	margin: 0 !important;
}
.pricing-tabs .et_pb_sum {
	font-size: 38px;
	font-weight: 100;
	margin-left: 15px;
}
.pricing-tabs .et_pb_dollar_sign,
.pricing-tabs .et_pb_sum {
	color: #199CDB;
}
.pricing-tabs .et_pb_pricing_content {
	padding: 30px 0;
	text-align: center;
}
.pricing-tabs .et_pb_pricing li {
	padding: 0 0 10px;
}
.pricing-tabs .et_pb_button {
	position: absolute;
	bottom: 30px;
	width: 120px;
	margin-left: -60px;
	font-family: "Open Sans", Arial, sans-serif;
	font-size: 16px;
	color: #199CDB;
	border-radius: 25px;
}
.pricing-tabs .et_pb_button:after {
	display: none;
}
.pricing-tabs .et_pb_button:hover {
	background: #199CDB;
	color: #FFF;
	border: 2px solid #199CDB;
	padding: 0.3em 1em;
}
Now let me explain a few things:
- Note that I’ve added the
.pricing-tabscustom class to the Tabs module so those CSS styling will be applied only to this Tabs module and the Pricing tables inside this module. - Of course, you can add the custom class to another Tabs module so you make it similar with this one. You can also add the custom class to Pricing tables too, to some extent.
- The cars icons used are actually from an icon font file, but you can also use icons from Font Awesome font, Dashicons font, ETmodules font, or you can add images as backgrounds.
BASIC HAND WASH
25 min- Exterior Hand Wash
- Towel Hand Dry
- Wheel Shine
DELUXE WASH
45 min- Exterior Hand Wash
- Towel Hand Dry
- Wheel Shine
- Tire Dressing
- Windows In & Out
- Sealer Hand Wax
ULTIMATE SHINE
60 min- Exterior Hand Wash
- Towel Hand Dry
- Wheel Shine
- Tire Dressing
- Windows In & Out
- Sealer Hand Wax
- Interior Vacuum
- Trunk Vacuum
- Door Shuts & Plastics
- Dashboard Clean
PLATINUM WORKS
100 min- Exterior Hand Wash
- Towel Hand Dry
- Wheel Shine
- Tire Dressing
- Windows In & Out
- Sealer Hand Wax
- Interior Vacuum
- Trunk Vacuum
- Door Shuts & Plastics
- Dashboard Clean
- Air Freshener
- Triple Coat Hand Wax
- Exterior Vinyl Protectant
BASIC HAND WASH
30 min- Exterior Hand Wash
- Towel Hand Dry
- Wheel Shine
DELUXE WASH
55 min- Exterior Hand Wash
- Towel Hand Dry
- Wheel Shine
- Tire Dressing
- Windows In & Out
- Sealer Hand Wax
ULTIMATE SHINE
80 min- Exterior Hand Wash
- Towel Hand Dry
- Wheel Shine
- Tire Dressing
- Windows In & Out
- Sealer Hand Wax
- Interior Vacuum
- Trunk Vacuum
- Door Shuts & Plastics
- Dashboard Clean
PLATINUM WORKS
125 min- Exterior Hand Wash
- Towel Hand Dry
- Wheel Shine
- Tire Dressing
- Windows In & Out
- Sealer Hand Wax
- Interior Vacuum
- Trunk Vacuum
- Door Shuts & Plastics
- Dashboard Clean
- Air Freshener
- Triple Coat Hand Wax
- Exterior Vinyl Protectant
BASIC HAND WASH
25 min- Exterior Hand Wash
- Towel Hand Dry
- Wheel Shine
DELUXE WASH
45 min- Exterior Hand Wash
- Towel Hand Dry
- Wheel Shine
- Tire Dressing
- Windows In & Out
- Sealer Hand Wax
ULTIMATE SHINE
60 min- Exterior Hand Wash
- Towel Hand Dry
- Wheel Shine
- Tire Dressing
- Windows In & Out
- Sealer Hand Wax
- Interior Vacuum
- Trunk Vacuum
- Door Shuts & Plastics
- Dashboard Clean
BASIC HAND WASH
25 min- Exterior Hand Wash
- Towel Hand Dry
- Wheel Shine
DELUXE WASH
45 min- Exterior Hand Wash
- Towel Hand Dry
- Wheel Shine
- Tire Dressing
- Windows In & Out
- Sealer Hand Wax
BASIC HAND WASH
25 min- Exterior Hand Wash
- Towel Hand Dry
- Wheel Shine
DELUXE WASH
45 min- Exterior Hand Wash
- Towel Hand Dry
- Wheel Shine
- Tire Dressing
- Windows In & Out
- Sealer Hand Wax